Here is a major update to the SQLite in Unity that support show to access an SQLite database in Unity using only Bolt.

For this to work you need to have SQLite setup in Unity already, and a database created inside your projects “Assets” folder.

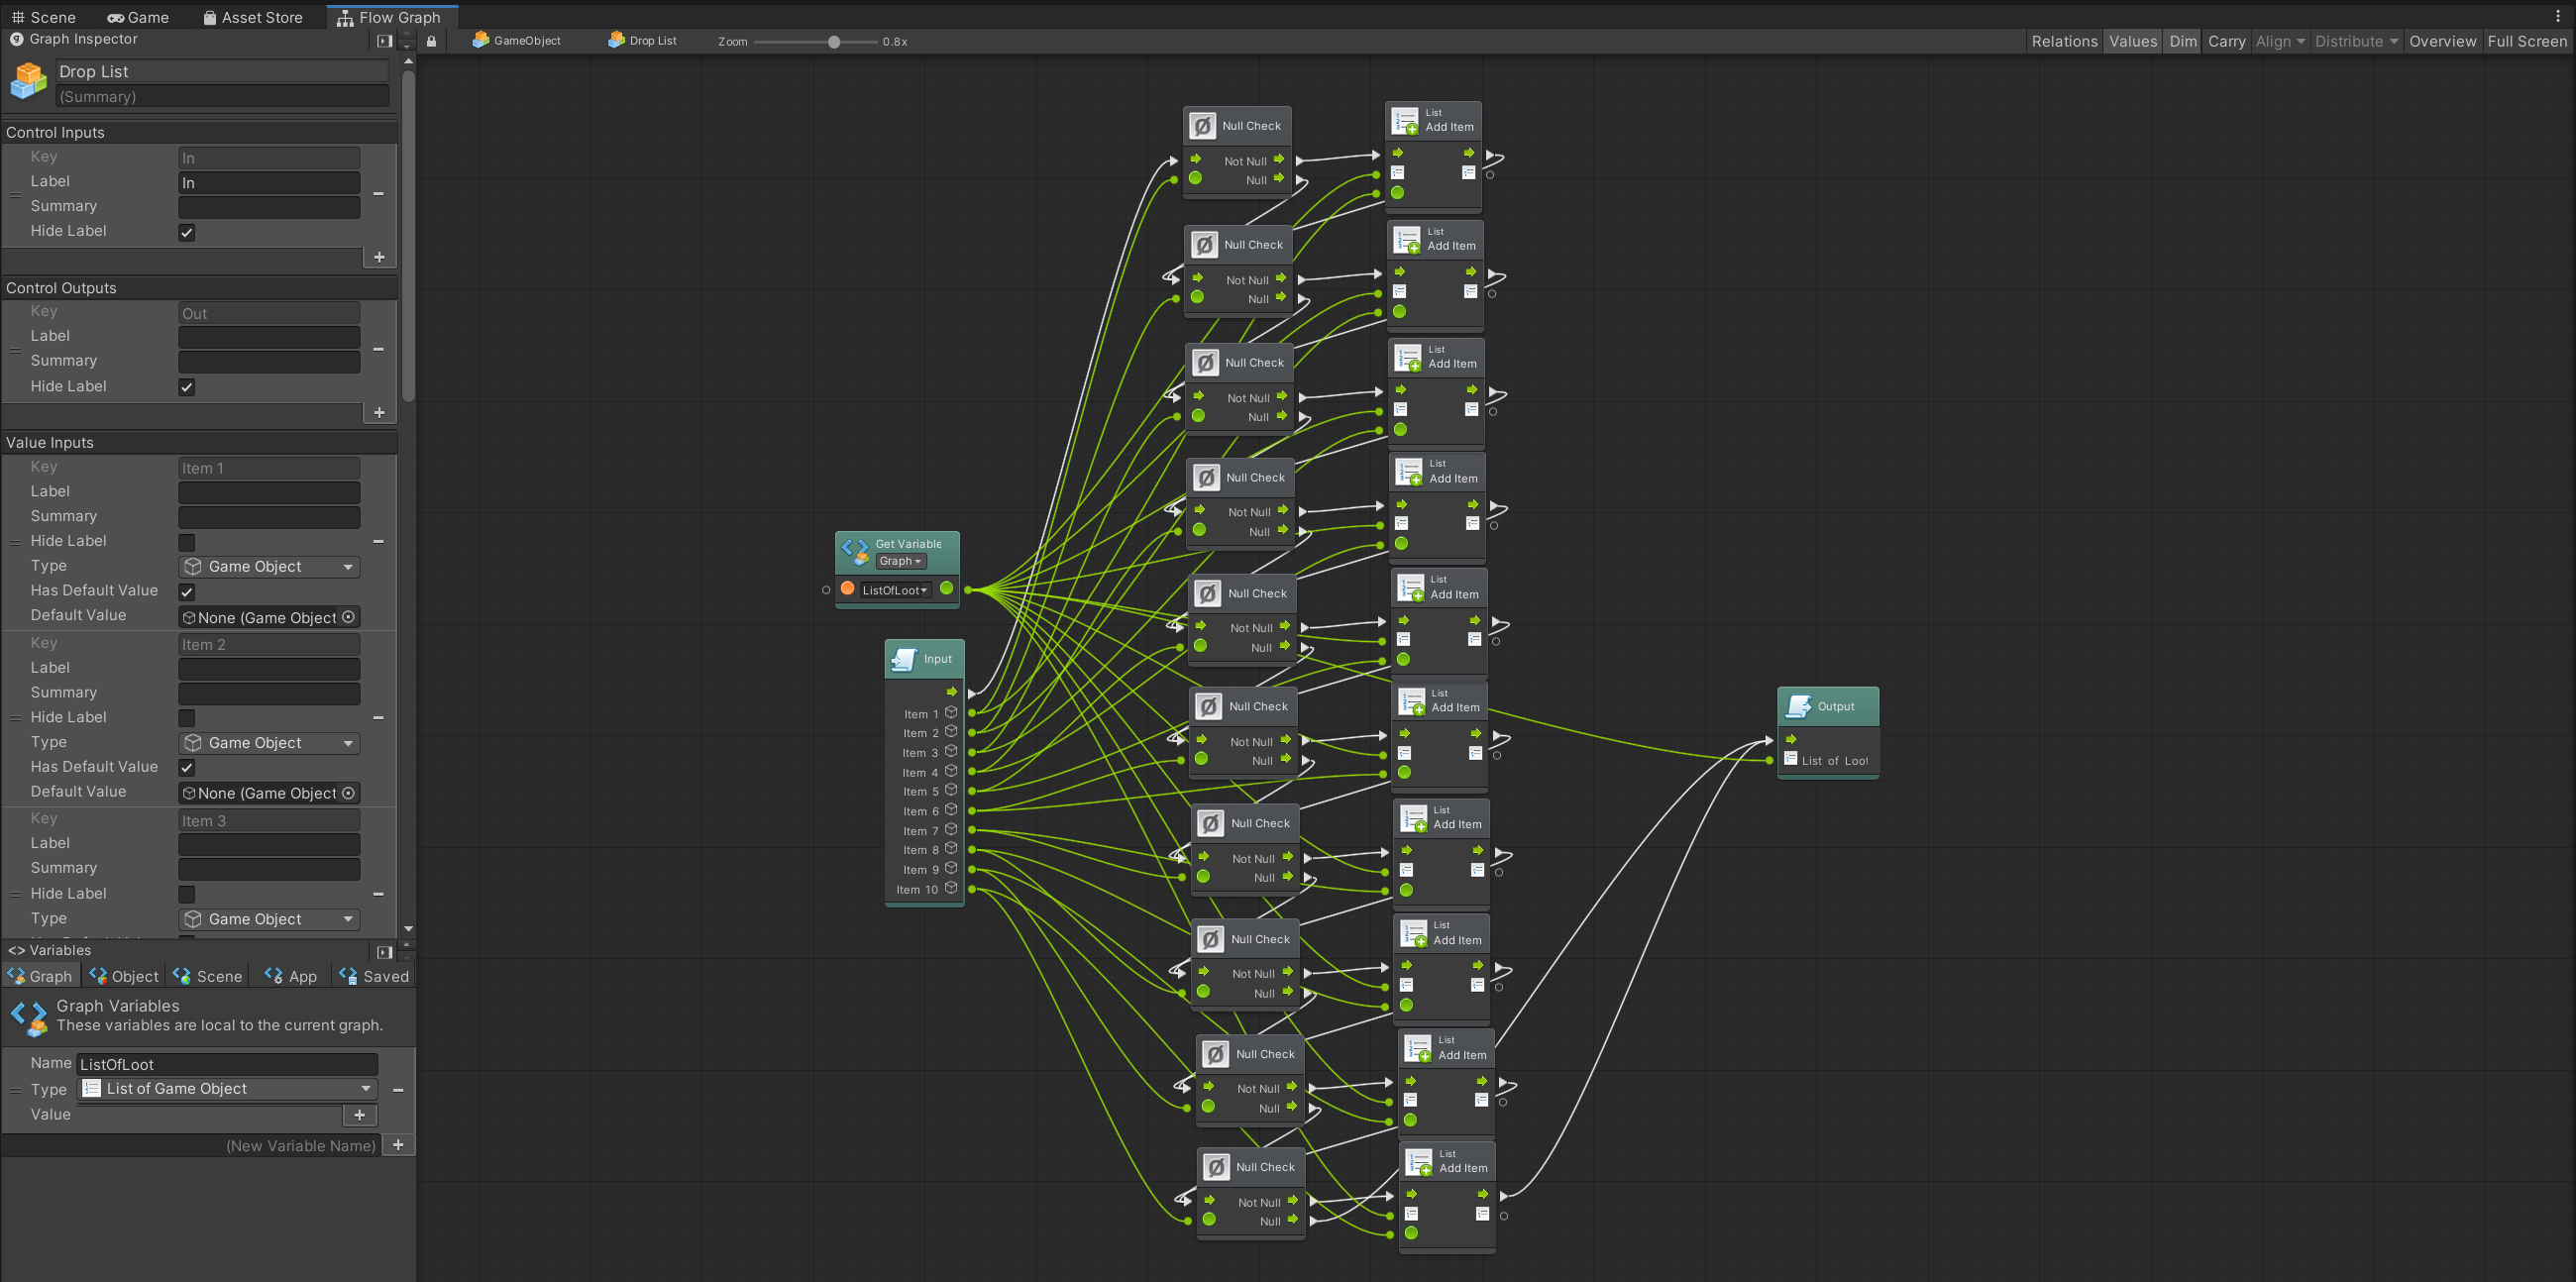
This example connects to the database and asked for all of the “gamename” entries in the database table called “games”.

SELECT gamename FROM games

The data is returned to Bolt and accessed using A “Data Record Interface” that lets us put the returned values into a list.. (here we only process the result of 0 or first field of the array of returned results) resulting in a list of game names retrieved from the database.

Note: The DB_Results ‘Scene Variable’ that is storing all of the names of the games pulled from the database results is set to be a ‘List of String’.

If we changed the query to ask for the gamename and genre we would then need to process index “0” and “1” [0 = gamename & 1=genre] for each result.

SELECT gamename, genre FROM games
Click for a larger view of the graph.

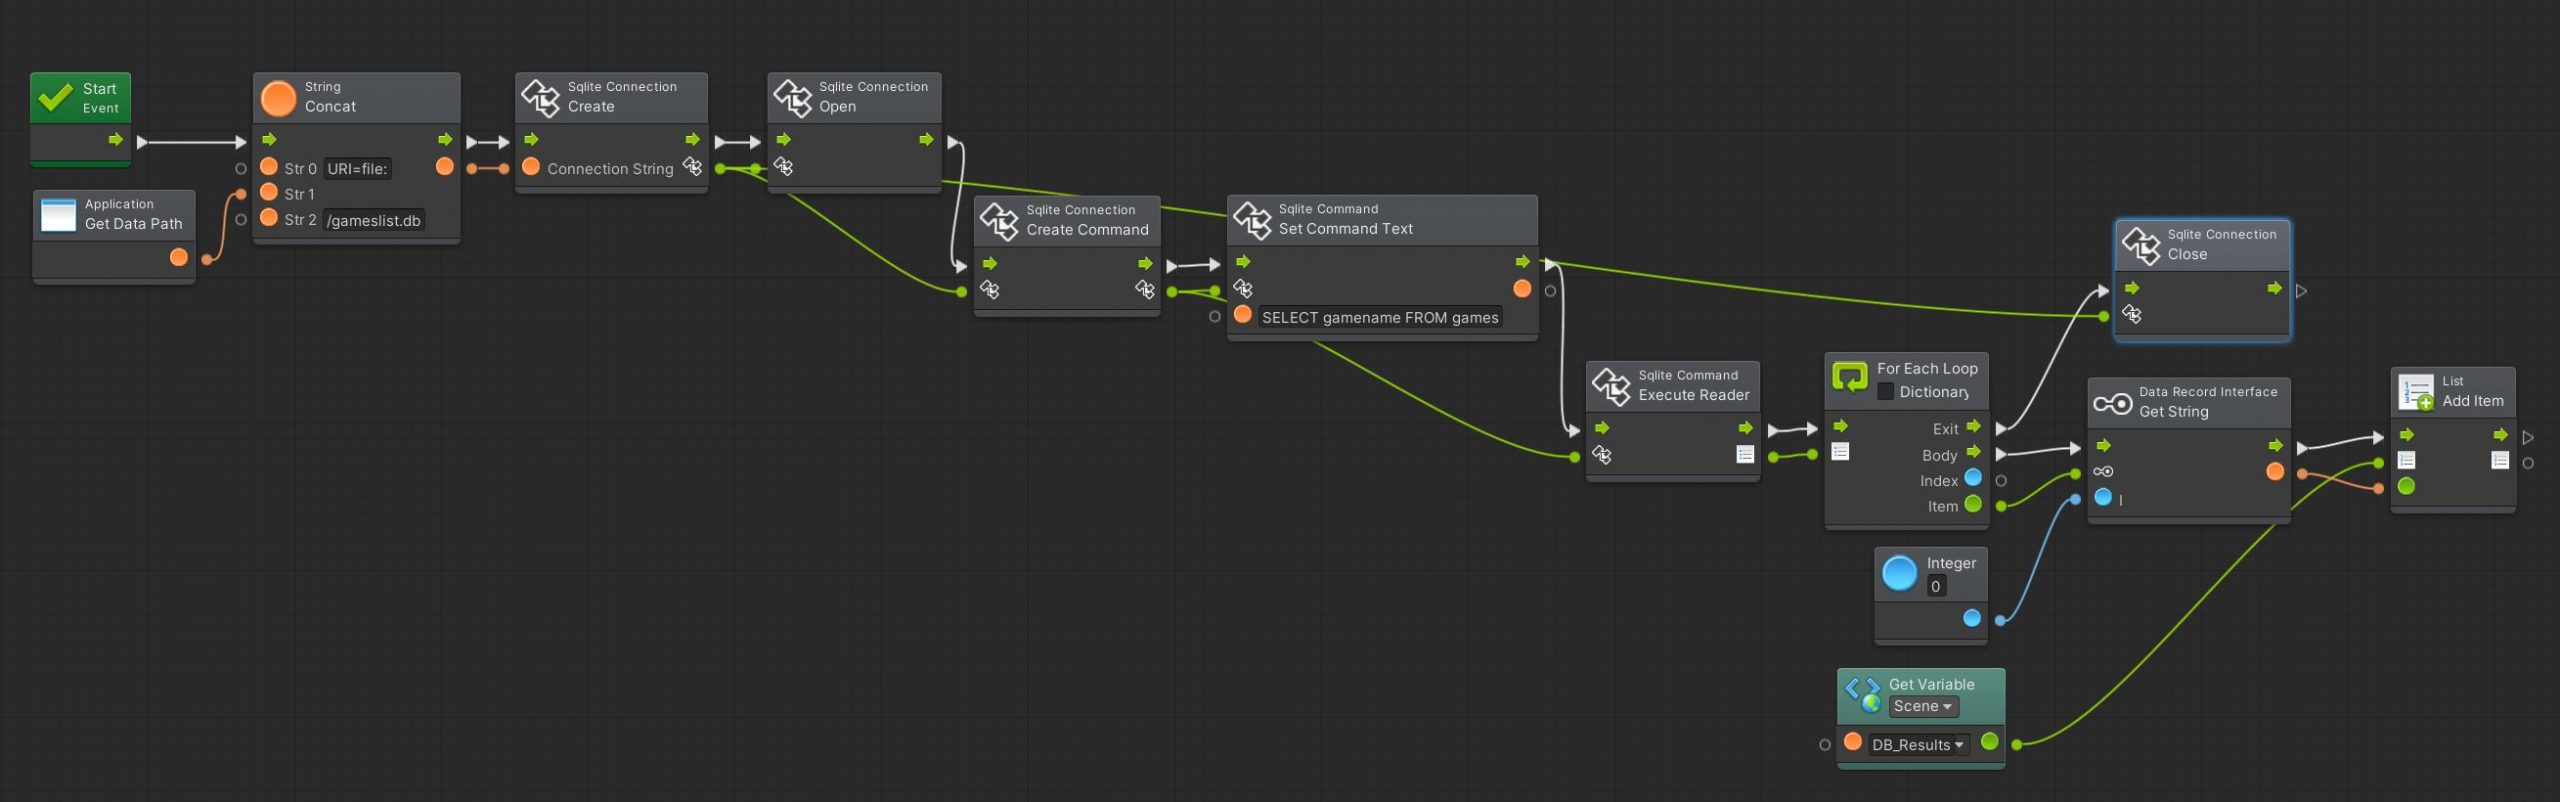
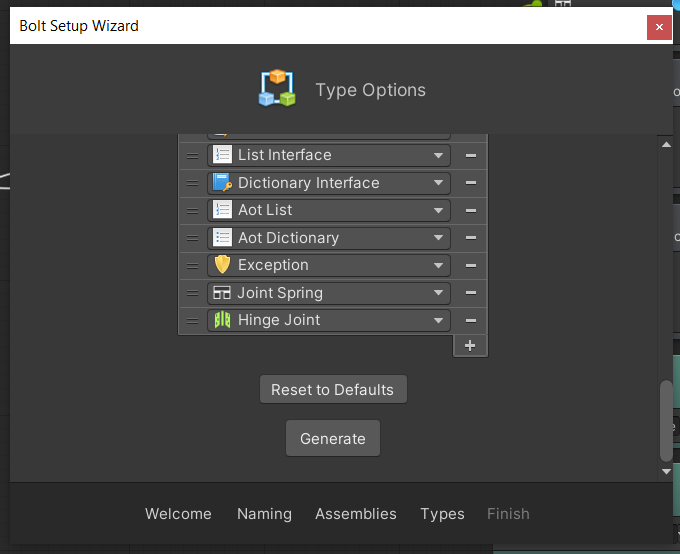
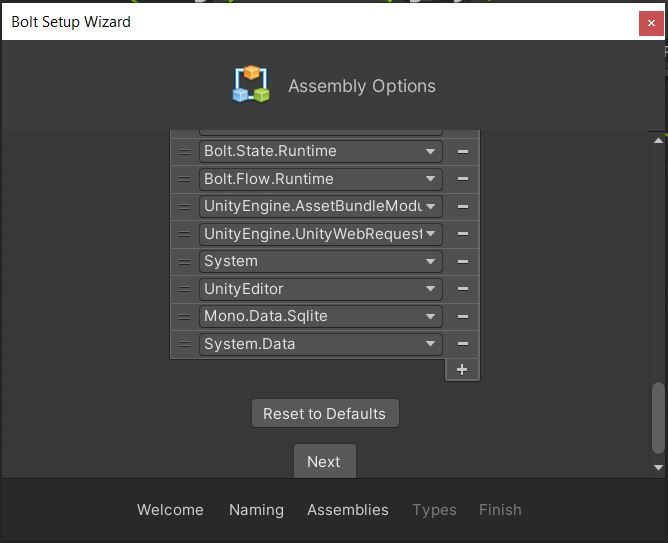
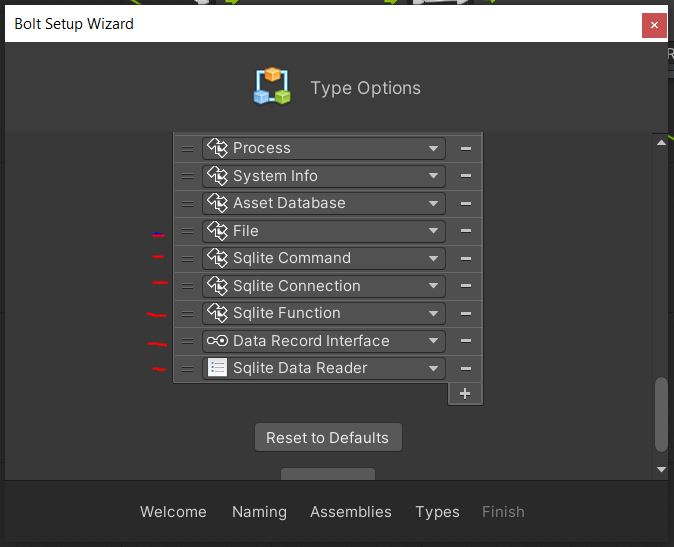
There are a few extra “Assembly & Types” that need to be added to Bolt for this to work. Due to the project i was working on not all of these may be needed but you should be able to understand which ones are SQLite oriented.

Mono.Data.Sqlite, System.Data (For Sure)
Sqlite Command, Sqlite Connection, Data Record Interface (For Sure)

IMPORTANT WHEN BUILDING

You need to set the Player API Compatibility Level to “.NET 4.0” in the “Other” Settings and you need to copy the “System.Data.dll” and “Mono.Data.Sqlite.dll” files from your Unity install folder and put it in your projects “Plugins” folder of the build will fail.

Example Install folder for system.data.dll location: “C:\Program Files\Unity\Editor\Data\MonoBleedingEdge\lib\mono\unityjit”

Wanting to create a pinball minigame I needed to create realistic pinball flippers, which were the second most important step after learning how to setup the gravity to make the ball move realistically. (Which I will also add into this note for future reference.)

Because Hinge Joints internal springs aren’t a simple variable and a part of a ‘struct’ which needs all of the variables set at once and then have them applied to the spring all at once. (I know right, If I had hair I would have ripped it out building this Graph because it didn’t follow the rules I was use to using.. damn structs.

In order to access the “Joint Spring” inside the “Hinge Joint” we need to add it to the Bolt Type Options.

Add Joint Spring to the Type Options in the Bolt Setup Wizard.

Before we get to the graph I want to explain what it’s doing and why it acts differently then setting other component options, keep in mind the struct thing we mentioned above.

We need to first get the Hinge Joint when the program starts. We then get the joint spring that it’s using. Then we create a new spring. Next we apply all 3 variable changes to the new spring, and then replace the old spring with the new one.. applying all of the changes we wanted to the three options of ‘spring’, ‘damper’, ‘target position’. (What a long way around.)

Here is the Graph with a left and right pinball flipper that flip up 45 degrees when the correct input is pressed.

Click for a larger view.

We setup variables for spring and damper so that we could change them quickly for testing but if you are getting this advanced in bolt you should be able to understand what this graph is doing.

Pinball Gravity

As a bonus here is how we setup the pinball gravity for this scene and set it back in other scenes so each scene can have it’s own gravity since the project that this is for has multiple mini games.

Default Gravity so we can re-use this code to set the gravity back to default.

Lerp movement and rotation is a quick way to animate game object movement in Unity. Here is a Rotational Lerp in Bolt. This example shows how to rotate a pinball flipper when a button is held down and then puts it back to it’s original position after the button is let go.

It’s important to note the use of Input.GetButton which relies on the variable name used in the unity Players button mapping. This will return true or false depending if the button is held down or not.

Also the mix of Vector3 and Quaternions can get messy, which is why we use Euler angles here, because it converts Vector3 into Quaternions.

There are Graph-Variables show for the alternate flipper in this image as well so don’t let that throw you off when reading this Graph.

Update:

We went with Hinge Joints to use the built in Unity Physics. However we did use Lerp to animate player pieces moving around a board game board from square to square. It just didn’t feel right for pinball flippers.

Dropping loot from enemies in any game should have an element of wonder, and to get that loot should be randomized and have a common to legendary drop rate, making it harder to get certain items.

I wanted to make this loot system simple to build and easy to populate. It allows for you to create and generate drops based on rarity and loot tables so enemies can have custom drop lists.

The entire system in two super units on a single Bolt graph. The Unity Event and Debug Log are just to help show the system working and are not needed.

In this example we are using only one Drop List and have linked it to all of the rarity slots on the Loot Drop super unit. Ideally you would want to create a drop list for each of the rarity slots on the loot drop super unit.

If you wanted some items to drop 100 percent of the time you would attach that Drop List to the 100 Percent node. If you had a super rare list of item that should only drop 1 percent of the time you would attach that Drop List to the 1 percent node.. and so on for all of the percentage nodes.

This is an extensive loot drop system, you can cut back on how many percentage nodes you have and then amount of items available to be dropped in the Drop List to make it scale to a game with less loot options.

MWMDragon (This is based on MMO loot theory.)

A look inside the first super unit:

There must be a graph variable created to store these items here it’s called ListOfLoot.

This first super unit takes the 10 game objects that you drag and drop into the drop list slots and processes them into a list of game objects. If any of the drop item locations is left empty or if you only assign loot to a few random location, it takes that into account and still builds a list with no chances of an empty loot slot, preventing any errors right from the start. This loot list is then sent to the second super unit.

A look inside the second super unit:

Top half of the super units graph.
Second half of the super units graph.

This second super unit generates a random number between 0 and 100 and calls the right ‘percentage node’ to drop loot from. It them grabs the list of items in that percentage range and randomly chooses an item from that list of loot objects. It then takes that loot object and sends it out of the super unit to be sent to the Console window. This is where you can choose what to do with that loot drop in your game.

The Loot drop happened when I clicked the button in the middle of the screen showing that loot was indeed dropped.

(Look at the console window)

There you have it a Loot Drop system the relies on Loot Tables and a percentage chance of dropping certain items for your game. Is this the best and only way to do it, no, but this is my way of doing it.

I’ve found an easy way to create these timers in Bolt, they come in handy for many kinds of games. The timers start and stop with bool variables and updated a text with the current time counts.

Count Down Timer

The count down timer starts when the Countdown_Timer_Running variable is set to true the timer starts counting down from the Timer_Count_Down integer variable which is set in seconds (120 = 2 minutes). When the timer hits zero it stops running.

Stop Watch Timer

The Stop Watch timer starts when the Stopwatch_Timer_Running is set to True. and start counting up in seconds storing the full time passed in the Stopwater_Time Integer variable.

I do this quite often but why not just put a quick reference to raycasting in Bolt, right here, right where I can find it easily. Maybe even free up some of the limited memory in my head 😉

When the player clicks the mouse button on an object it checks if the object has the tag “Things” and if it does then you just need to extend this graph using the “True” pathway to make it do something.

Communicating scores and other information to PHP from within Unity is needed to enjoy an interactive experience in the way I want to offer it. Unity changed the back end of the WWW communication system and I figured since I need to relearn it, I could use Bolt to make it an easy rebuild in the future.

A few strings are sent to the PHP script as variables.

There will be more to this soon as I work more with it, I just wanted to be sure to document a working graph.

Any PHP script that this interacts with must have the proper headers or the code will do nothing.

<?
header("Access-Control-Allow-Credentials: true");
header('Access-Control-Allow-Origin: *');
header('Access-Control-Allow-Methods: POST, GET, OPTIONS');
header('Access-Control-Allow-Headers: Accept, X-Access-Token, X-Application-Name, X-Request-Sent-Time');
?>

Creating a timer in bolt wasn’t working for me so I wrote a script for it and then just integrated it with Bolt variables.

using System.Collections;
using System.Collections.Generic;
using UnityEngine;
using UnityEngine.UI;
using Bolt;

public class StopWatch : MonoBehaviour
{

    public Text text;
    float theTime;
    public float speed = 1;
    

    // Use this for initialization
    void Start()
    {
        //text = GetComponent(-INSERT LESS THAN SIGN -)Text(-INSERT GREATER THAN SIGN -)();
    }

    // Update is called once per frame
    void Update()
    {
    
        if ((bool)Variables.ActiveScene.Get("Timer_Running") == true)
        {
            theTime += Time.deltaTime * speed;
            string hours = Mathf.Floor((theTime % 216000) / 3600).ToString("00");
            string minutes = Mathf.Floor((theTime % 3600) / 60).ToString("00");
            string seconds = (theTime % 60).ToString("00");
            text.text = hours + ":" + minutes + ":" + seconds;
        }
    }

    public void ClickPlay()
    {
        
        Variables.ActiveScene.Set("Timer_Running", true);
    }

    public void ClickStop()
    {
        Variables.ActiveScene.Set("Timer_Running", false);
    }


}

You need to create two scene based variables.

  • theTime
  • Timer_Running

This script puts the timer in the text area on the UI. Just drag and drop this script onto an object in the scene and then drag and drop a text box into the variables area of the script, and you will be up and running. This time is great for timed games and in LMS software to see how long content takes to complete.

Count Down Timer

Here is a countdown timer pretty much working on the same variables

using System.Collections;
using System.Collections.Generic;
using UnityEngine;
using UnityEngine.UI;
using Bolt;

public class CountDown : MonoBehaviour
{
    public float timeRemaining = 10;
    public bool timerIsRunning = false;
    public Text timeText;

    private void Start()
    {
        // Starts the timer automatically
        timerIsRunning = true;
    }

    void Update()
    {
        if ((bool)Variables.ActiveScene.Get("Timer_Running") == true)
        {
            if (timeRemaining > 0)
            {
                timeRemaining -= Time.deltaTime;
                DisplayTime(timeRemaining);
            }
            else
            {
                Debug.Log("Time has run out!");
                timeRemaining = 0;
                timerIsRunning = false;
                Variables.ActiveScene.Set("Timer_Running", false);
                Variables.ActiveScene.Set("Time_Out", true);
            }
        }
    }

    void DisplayTime(float timeToDisplay)
    {
        timeToDisplay += 1;

        float minutes = Mathf.FloorToInt(timeToDisplay / 60);
        float seconds = Mathf.FloorToInt(timeToDisplay % 60);

        timeText.text = string.Format("{0:00}:{1:00}", minutes, seconds);
    }
}

We have worked with calling bold variable functions from within a script before, but now we are looking to use Bolt to call a custom Function from within a script.

After you have created the Class containing the function. You need to add that script as a component of the object that also has the Bolt “Flow Machine” component on it.

You then need to tell bolt to look for this new class, that way it can make use of the functions in the class. You can do this by choosing

Tools > Bolt > Update Unit Options

in the unity menu. After this has complete, add a new Unit in your Bolt flow graph and search for your functions name. You should be able to choose your function now.

The function just happens to have the same name as the script in this demonstration.

This allows us to create any function we want and integrate it with Bolt!

how this came about is that I was trying to store a .SWF file in an asset bundle and then load it at runtime, so that I could send it’s location to a stand alone flash player. This way it would load locally and not in a browser, so I would have full control over compatibility.

Unity limits the type of files that can be put into assetbundles so you need to change the extension on the file to “.bytes” and then it will be packed into the assetbundle as is.

You then load that file out of the assetbundle as a byte array and write it to a temporary file in your Assets folder at runtime, changing the extension on the file to be whatever is needed, in this case “.SWF”.

You now have a file taken out of the assetbundle and in a location where you can do anything with it. This allows you to store any file type inside an assetbundle and retrieve it for use in any way you like!

This process in BOLT