Using SQLite in Unity allows for full database access without having to send out external information or commands, as the database in stored with the game or app. This is not meant for secure information as anyone can open the database.

I haven’t tried any of this in BOLT yet but I will add to this post after I have tried it.

Steps to get setup

  1. Create a new folder under Assets called “Plugins” if there isn’t already one there.
  2. Download SQlite
  3. Copy “sqlite3.def” and “sqlite3.dll” into that Plugins folder you just created.
  4. Download an SQLite database manger program
  5. User the database manager program to create a new database in your projects “Assets” folder. (Make note of the full name of this database file)
  6. Copy “System.Data.dll” and “Mono.Data.Sqlite.dll” from your Unity install path + ” \Unity \Editor\Data\Mono\lib\mono\2.0 ” and paste them into the Plugins folder that you created.

If you are using Bolt in the project some of these files are already included and will give you an error in teh console until you remove the duplicate. Just delete the files mentioned as being duplicated in the console and everything will still work.

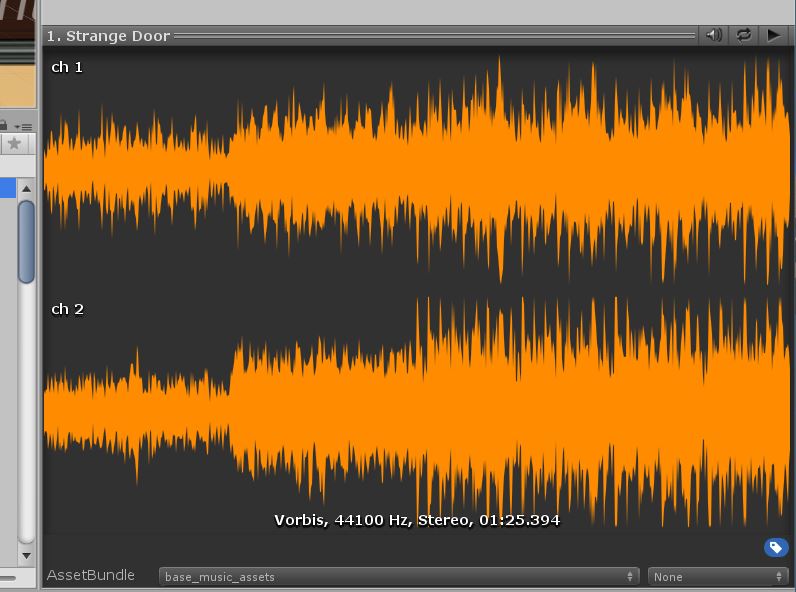
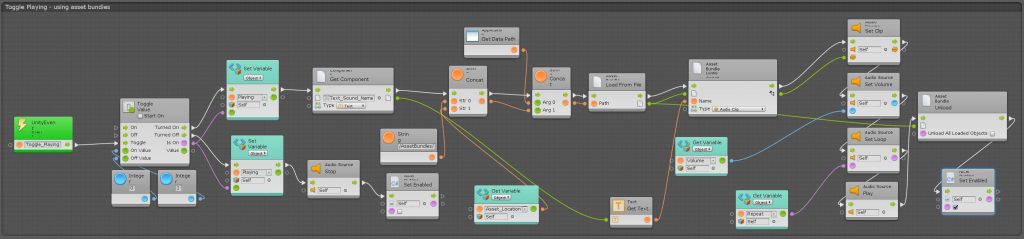
When used with Bolt.

You are now ready to create the C# code to connect to the database. Here is an example.

using System.Collections;
using System.Collections.Generic;
using UnityEngine;

using Mono.Data.Sqlite;
using System.Data;
using System;


public class databasetest : MonoBehaviour
{
    // Start is called before the first frame update
    void Start()
    {
        string conn = "URI=file:" + Application.dataPath + "/leaderboard.db"; //Path to database.
        
        Debug.Log(conn);
        IDbConnection dbconn;
        dbconn = (IDbConnection)new SqliteConnection(conn);
        dbconn.Open(); //Open connection to the database.
        IDbCommand dbcmd = dbconn.CreateCommand();
        string sqlQuery = "SELECT score_id, player_name, player_score " + "FROM Leaderboard_Table";
        dbcmd.CommandText = sqlQuery;
        IDataReader reader = dbcmd.ExecuteReader();
        while (reader.Read())
        {
            int score_idx = reader.GetInt32(0);
            string player_namex = reader.GetString(1);
            int player_scorex = reader.GetInt32(2);

            Debug.Log("scoreID= " + score_idx + "  name =" + player_namex + "  score =" + player_scorex);
        }
        reader.Close();
        reader = null;
        dbcmd.Dispose();
        dbcmd = null;
        dbconn.Close();
        dbconn = null;
    }

    // Update is called once per frame
    void Update()
    {
        
    }
}
  1. Replace “leaderboard.db” with the name of your database
  2. Edit “SELECT score_id, player_name, player_score ” + “FROM Leaderboard_Table” to reflect actual columns and tables from your database.
  3. Put this script on an active gameObject in your screen and the Console area should show you the information from your database.

If you are getting complaints about the Table not being found. Take a look at the name of your database and make sure it matches your code. My code said “Leaderboard.s3db” but my actual database was called “leaderboards.db”

SQLite creates a new empty database if it fails to find the one you specified in code, and that database will be completely empty, leading to the lack of finding a table.

Inserting data into the database

using System.Collections;
using System.Collections.Generic;
using UnityEngine;

using Mono.Data.Sqlite;
using System.Data;
using System;


public class database_senddata : MonoBehaviour
{
    // Start is called before the first frame update
    void Start()
    {
        string conn = "URI=file:" + Application.dataPath + "/leaderboard.db"; //Path to database.

        //Debug.Log(conn);
        IDbConnection dbconn;
        dbconn = (IDbConnection)new SqliteConnection(conn);
        dbconn.Open(); //Open connection to the database.
        IDbCommand dbcmd = dbconn.CreateCommand();
        
        // Getting Info From Database
//        string sqlQuery = "SELECT score_id, player_name, player_score " + "FROM Leaderboard_Table";

        // Sending Info to Database
        string sqlQuery = "INSERT INTO Leaderboard_Table (player_name, player_score) VALUES ('newentry','1000')";

        dbcmd.CommandText = sqlQuery;
        IDataReader reader = dbcmd.ExecuteReader();

        // Getting information from the database **************************************
        //        
        //        while (reader.Read())
        //        {
        //            int score_idx = reader.GetInt32(0);
        //            string player_namex = reader.GetString(1);
        //            int player_scorex = reader.GetInt32(2);
        //
        //            Debug.Log("scoreID= " + score_idx + "  name =" + player_namex + "  score =" + player_scorex);
        //        }
        //
        // ****************************************************************************


        // Sending information to the database Just requires the sqlQuery be changed to an INSERT

        reader.Close();
        reader = null;
        dbcmd.Dispose();
        dbcmd = null;
        dbconn.Close();
        dbconn = null;
    }

    // Update is called once per frame
    void Update()
    {

    }
}

This code is the same as above except the reading of data has been commented out and an INSERT command had been put in it’s place. This allows us to add information to the database.

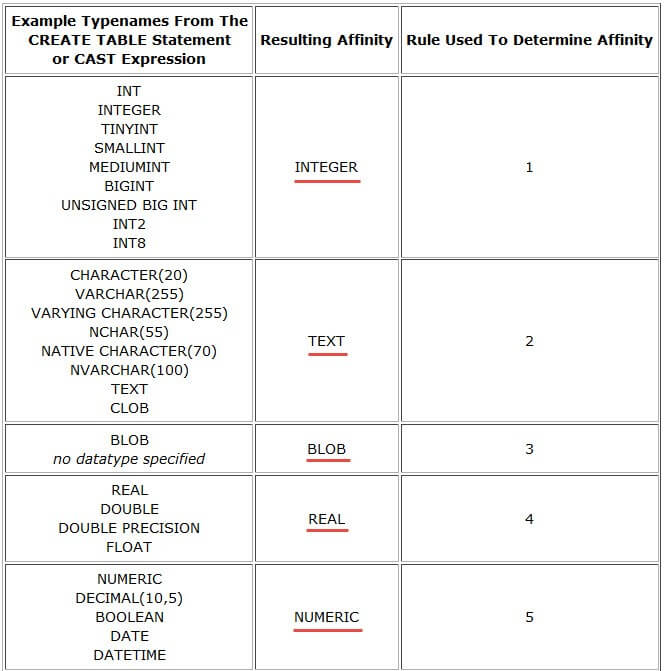
Here are the data types for SQLite

how this came about is that I was trying to store a .SWF file in an asset bundle and then load it at runtime, so that I could send it’s location to a stand alone flash player. This way it would load locally and not in a browser, so I would have full control over compatibility.

Unity limits the type of files that can be put into assetbundles so you need to change the extension on the file to “.bytes” and then it will be packed into the assetbundle as is.

You then load that file out of the assetbundle as a byte array and write it to a temporary file in your Assets folder at runtime, changing the extension on the file to be whatever is needed, in this case “.SWF”.

You now have a file taken out of the assetbundle and in a location where you can do anything with it. This allows you to store any file type inside an assetbundle and retrieve it for use in any way you like!

This process in BOLT

This has been used for an in-game notification icon that blinks when a new notification is available.

A Scene bool variable called “NewNotification” triggers this code to be run. During the code block we need to wait for the fading and unfading to complete before the “OnUpdate” tells the block of code to run again. If it tries to start it again before it’s done the blinking cycle, it makes the blink fail. To support this we have a Graph based bool variable called “Blinker”

If Blinker is true our block of code know that the blink hasn’t finished yet and waits until the bool is False again, meaning that it can initiate another blink.

Note: This code block must be set as a co-routine as we use Wait Timers.

Using bolt for the bulk of a projects can speed up development, however bolt doesn’t integrate with everything you may want to import into your projects like specialized assets from the unity asset store. To access the Bolt variables using c# code you can write small scripts what make use of one of the most powerful features in bolt.

using Bolt;
//**** SET ****
// Application Variables
Variables.Application.Set("DLC1_Owned", true);

// Scene Variables
Variables.ActiveScene.Set("Timer_Running", true);


//**** GET ****
//
(bool)Variables.ActiveScene.Get("Timer_Running");

This code lets the project know that you want to use Bolt references inside this script and then second line of code sets the Application level variable called “DLC!_Owned” to True (As it’s a bool variable)

Refernce: https://ludiq.io/bolt/manual/scripting/variables

Some projects have folders that allow users to add their own files into the software at runtime. A great way to alleviate the stress of finding that folder is to have a button in the software that opens it for them.

public void ViewOGGsFolder()
    {
  System.Diagnostics.Process.Start(Application.dataPath+"/OGGs/");
    }

This code can be attached to an onclick event of a button and when that button is clicked it will open the “OGGs” folder from within the Assets of the software.

Not as relevant when you are using Steam but if you wanted to use a program in a corporate environment that makes use of an SSO or Single Sign On in Windows, this is how you can retrieve that information from within Unity. The first version of BOLT does not support this so it must be done in code. Here is the code that will sent the username of the person currently signed into windows, to the console window when the program starts.

using System;
using System.Collections;
using System.Collections.Generic;
using UnityEngine;

public class testing : MonoBehaviour
{
    // Start is called before the first frame update
    void Start()
    {
        Debug.Log(Environment.UserName);
    }

    // Update is called once per frame
    void Update()
    {
        
    }
}

The important part is the “Environment.UserName” but it requires that you have the “using System;” declared or it won’t work.

UPDATE:

In the Bolt setup wizard if you add “Environment” to the types list you will be able to access Environments from within the Graphs.

You can add a lot of new features to Bolt in this way.
Bolt is easily expanded.

When using a Scroll View in unity, you can set it’s size or have it dynamically scale. I’m many projects dynamic scaling seems to be the best option. To make the scroll view auto scale you need to add two components to the content object.

The Content Object contains the objects that need to be scrolled to be viewed.

A “Content Size Fitter” set to constrain the view-able area to the preferred size is needed to keep the scroll bars updated.

A Grid Layout Group will make sure the content in the “Content” object are displayed in a nice orderly fashion and at the size they are supposed to be viewed. the “Cell Size” should be set to the individual content size. if you are displaying more than one content item at a time then setting the spacing between the items makes everything look well organized.

Steamworks.NET is the package used to get your project ready for a Steam release.

https://steamworks.github.io/

After it’s inportred into your Unity project, you will need to add a SteamManager GameObject as per the instruction on the installation page for Steamworks .NET. You will also need a .TXT file with your Steam AppID number inside it placed in your build folder that is ready for release.. More info below.

Making Use of Steamworks .NET

You can use it to get player names, check if DLC is owned and a whole ton of other stuff. You are required to make a Steam based script to make use of any of these options. Here is the one I use to see if Steam is initialized, get the persons Steam Name and check if DLC are owned. There is also a bunch of other crap in this script that I don’t feel like cleaning out because it may jog my memory on how to do something.

Just add this script onto an empty GameObject in the scene.

using UnityEngine;
using System.Collections;
using Steamworks;
using UnityEngine.UI;

public class MySteamScript : MonoBehaviour
{

    //public GameObject License_Info;
    public GameObject SteamNameDisplay;

    // Use this for initialization
    void Start()
    {


        if (SteamManager.Initialized)
        {
            //string name = SteamFriends.GetPersonaName();
            Debug.Log("Steam Initialized");
            string name = SteamFriends.GetPersonaName();
            Debug.Log(name);
            SteamNameDisplay.GetComponent<Text>().text = name;


            //***** Real DLC Checks happens in MapEditor_GUI *****

            // Check DLC_F1 Ownership [Free1]
            // Debug.Log("DLC_F1 Owned:" + SteamApps.BIsDlcInstalled((AppId_t)500840));

            // Check DLC_1 Ownership [Interiors]
            // Debug.Log("DLC_1 Owned:" + SteamApps.BIsDlcInstalled((AppId_t)497521));

            // Check DLC_2 Ownership [Graveyard]
            // Debug.Log("DLC_2 Owned:" + SteamApps.BIsDlcInstalled((AppId_t)506350));

            // Check DLC_2 Ownership [Caves]
            // Debug.Log("DLC_3 Owned:" + SteamApps.BIsDlcInstalled((AppId_t)510400));

            // Check DLC_4 Ownership [Landscape]
            // Debug.Log("DLC_4 Owned:" + SteamApps.BIsDlcInstalled((AppId_t)497520));

            // Check Commercial License Ownership 
            //  Debug.Log("Commercial Owned:" + SteamApps.BIsDlcInstalled((AppId_t)503880));
            //  if (SteamApps.BIsDlcInstalled((AppId_t)503880) == true)
            //  {
            //      License_Info.active = true;
            //  }
            //  else { License_Info.active = false; }


            // Acheivements (Start the program)
            //   SteamUserStats.SetAchievement("ACHIEVEMENT_1");
            //   SteamUserStats.StoreStats();
            //   Debug.Log("Acievement Earned!");
        }
        else
        {

            Application.Quit();
        }

    }

    //    void achievement_cartographer()
    //    {
    //        // Call from another script in javascript: GameObject.Find("Steamworks").SendMessage("achievement_cartographer");
    //        // Acheivements (open the map editor)
    //        SteamUserStats.SetAchievement("CARTOGRAPHER_1_1");
    //        SteamUserStats.StoreStats();
    //        //Debug.Log("Acievement Earned!");
    //    }

    // Update is called once per frame
    void Update()
    {

    }

    public string Get_SteamName()
    {
        return SteamFriends.GetPersonaName();
    }


}

Building the App for Depot Upload

This requires the use of the Steamworks SDK which is a command prompt based program that will self update before doing anything. I give each release it’s own folder with the Steamworks SDK as it needs to have some script files edited to properly packaged and upload your release to Steam.

Once signed into your Steamworks account you can download the latest .ZIP file containing the SDK Files

https://partner.steamgames.com/dashboard
Old version update themselves when run so a folder copied from another project can work

Once you have it downloaded uncompress it so it’s ready to have your new App or Game Build files added to it. Under ContentBuilder in the SDK folder you will have access to what we need to build the game package and upload it to Steam.

EXAMPLE: G:\Ambient_DM\steamworks_sdk_137\sdk\tools\ContentBuilder

AppID (Required for Building)

The AppID is the unique ID steam gave your app once you have paid the fee to have a Game for sale on Steam.

At the time of writing this it was $130 CAD

The AppID can be found with the application name, in brackets, within steamworks.

The AppID is 1050330

DepotID (Required for Building)

The DepotID or Depot Number let steam know which build of the game you are uploading as you can have multiple version. 32bit, 64bit, Mac, Linux, Beta Testing and Patch Testing releases to name a few. This number is need for the build scripts and is normally the AppID with an incremented number for the last digit.

The DepotID or Number is 1050331 and this app only has one release depot.

Edit the build scripts for your Project

When you want to build the package of your game files to upload to steam you need to edit two script files to reflect your AppID and DepotID., so Steam know what you are uploading and which release depot it is. In the “SCripts” Folder there are two scripts you can open in Notepad and edit easily.

app_build_1001.vdf

You must rename this file, replacing the “1001” with your AppID.
In this script it asks for your AppID and your DepotID.
You will notice that the AppID is: 1050330 and the DepotID is: 1050331. It also makes reference to the second script we need to edit called depot_build_1001.vdf. You must change the “1001” to match your DepotID as we will be renaming the second script to match. Here you can see it has already been renamed.

"appbuild"
{
	// Set the app ID that this script will upload.
	"appid" "1050330"

	// The description for this build.
	// The description is only visible to you in the 'Your Builds' section of the App Admin panel.
	// This can be changed at any time after uploading a build on the 'Your Builds' page.
	"desc" "Your build description here"

	// Enable/Disable whether this a preview build.
	// It's highly recommended that you use preview builds while doing the initially setting up SteamPipe to
	// ensure that the depot manifest contains the correct files.
	"preview" "0"

	// File path of the local content server if it's enabled.
	"local" ""

	// Branch name to automatically set live after successful build, none if empty.
	// Note that the 'default' branch can not be set live automatically. That must be done through the App Admin panel.
	"setlive" ""


	// The following paths can be absolute or relative to location of the script.

	// This directory will be the location for build logs, chunk cache, and intermediate output.
	// The cache stored within this causes future SteamPipe uploads to complete quicker by using diffing.
	"buildoutput" "..\output\"

	// The root of the content folder.
	"contentroot" "..\content\"

	// The list of depots included in this build.
	"depots"
	{
		"1050331" "depot_build_1050331.vdf"
	}
}

depot_build_1001.vdf

You must rename this file, replacing the “1001” with yourDepotID.

This script needs your DepotID entered at the top, it also need the complete path to your game files you want to be uploaded to Steam. As you can see from teh script they are stored in a folder called “content”. I’ve put them in an X64 folder as well incase I want to make a 32bit guild as well. but normally your files just go in the content folder.. we will get tot that later.

"DepotBuildConfig"
{
	// Set your assigned depot ID here
	"DepotID" "1050331"

	// Set a root for all content.
	// All relative paths specified below (LocalPath in FileMapping entries, and FileExclusion paths)
	// will be resolved relative to this root.
	// If you don't define ContentRoot, then it will be assumed to be
	// the location of this script file, which probably isn't what you want
	"ContentRoot"	"G:\Ambient_DM\steamworks_sdk_137\sdk\tools\ContentBuilder\content\X64\"

	// include all files recursivley
  "FileMapping"
  {
  	// This can be a full path, or a path relative to ContentRoot
    "LocalPath" "*"
    
    // This is a path relative to the install folder of your game
    "DepotPath" "."
    
    // If LocalPath contains wildcards, setting this means that all
    // matching files within subdirectories of LocalPath will also
    // be included.
    "recursive" "1"
  }

	// but exclude all symbol files  
	// This can be a full path, or a path relative to ContentRoot
  "FileExclusion" "*.pdb"
}

Prepping Your Game Files

When you make an App or Game in unity you need to “Build” the game into a folder in order to use it outside of the unity editor. Once you have your game built and ready to use, you need to make sure you have your steam_appid.txt file inside that build folder. That file simply included your AppID as the only text in the file.

EXAMPLE: 1050330

NOTE: If you are using AssetBundles you will need to copy the “AssetBundles” Folder from inside you Unity Project and place it inside your games “Data” folder. The last build I did while writing this had a data folder called “Ambient DM_Data”.

Demonstration of my game files structure for release.

Copy all of the files from your final build folder and paste them into the “content” folder as these are the files Steam will upload.

EXAMPLE: G:\Ambient_DM\steamworks_sdk_137\sdk\tools\ContentBuilder\content

Running the Builder

Still within the Steamworkd SDK’s “ContentBuilder” folder we want to go into the “builder” folder. And run the “steamcmd.exe” file. After it tries to update it will give you a command prompt where we need to login to steam and then tell it to run the building script.

Here is the Steamcmd.exe window when it’s ready to use

Login to Steam using your account information using the command shown below. if you have 2-factor sign-in enabled it will ask you for your authenticator number.

login username password

NOTE: Doing this will kick your Steam game client off of Steam, so it will say “DISCONNECTED” and need to be restarted if you want to play any games later.

After you are signed in and authenticated this is what you see. (Obscured Passwords for Safety)

Next we will be running those scripts we edited earlier with the AppID and DepotID inside them and then the build and upload will start.

run_app_build G:\Ambient_DM\steamworks_sdk_137\sdk\tools\ContentBuilder\scripts\app_build_1050330.vdf

NOTE: Remember to rename the “app_build_1050330.vdf” script name to be your App script name or it won’t work.. also make sure you put the complete path to that script or it will fail. If your AppID or DepotID are wrong it will chug along building the files into a release and then give you an error saying that there was a “Wrong Parameter”.

If everything was done correctly, the script with package the files and upload them, using dots to show progress.. this can take some time depending on your upload speed. You can now set this build as active in your Steamworks page on the steam website.. remember to click publish after you have set the new build as the default release.

For AssetBundles to be available in BOLT you first have to add the proper option to the “Assembly Options” in the BOLT setup area.

UnityEngine.AssetBundleModule

Loading AssetBundles

Loading Assets from a bundle in Unity to prevent the 5GB limit that the “Resource” folder puts on all project assets loaded during runtime.

Making use of AssetBundles in BOLT for Unity

This was the simple asset loading and unloading BOLT graph I put together to help others who were having issues using AssetBundles in BOLT.

NOTE: There is a loading and unloading delay if your asset packing script in Unity is set to compress the assets. It’s best to leave the uncompressed for quick loading.

Tagging Assets to be Bundled

You must tag all of the assets you want in the AssetBundle using “AssetBundle Tag” located in the Preview window of Unity. You can split the assets into multiple bundles to make them load faster.

Bottom Left “AssetBundle” Tag area. Mark assets with thee tags to have them built into the bundles by the script above.

Asset Bundle Building Script

Here is the script needed to build uncompressed AssetBundles in Unity. Create this C# script and put it in the “Editor” directory under “Assets”.

using UnityEditor;
using System.IO;

public class CreateAssetBundles
{
    [MenuItem("Assets/Build AssetBundles")]
    static void BuildAllAssetBundles()
    {
        string assetBundleDirectory = "Assets/AssetBundles";
        if (!Directory.Exists(assetBundleDirectory))
        {
            Directory.CreateDirectory(assetBundleDirectory);
        }
        BuildPipeline.BuildAssetBundles(assetBundleDirectory, BuildAssetBundleOptions.UncompressedAssetBundle, BuildTarget.StandaloneWindows);
    }
}

Loading from Multiple Bundles

This is an advanced example of loading from multiple AssetBundles. In this example when a “Play” button is pushed it sets the Playing variable to TRUE and loads the sound file based on the sound name that was stored in a UI Text component. It also gets which AssetBundle the asset should be loaded from using another variable that was set earlier that contains the name of the asset bundle (It matches the AssetBundle Tag) It then takes the location of the App on the computer and STRING Concats everything together to load the assetbundle and then the file needed from inside. Sets the Volume and plays the audio clip that was loaded. It ends by unloading the asset. So this Graph loads the asset from the assetbundle and plays it and then unloads the assetbundle.